宝塔面板Nginx配合shell脚本实现自动封禁IP 防御CC DDOS攻击方法
宝塔面板现在很多小白用户使用的非常多,功能比较简单易用,但是其中防御功能较弱,内置的WAF并不能实现服务器级别的防火墙封IP,所以我们只能借用一下其中的功能,加上LINUX系统天然自带的SHELL+IPTABLES防火墙来封禁IP
宝塔安装的NGINX按下面配置
软件管理-Nginx管理-配置修改
将
error_log /www/wwwlogs/nginx_error.log crit;
改成
error_log /www/wwwlogs/nginx_error.log error;
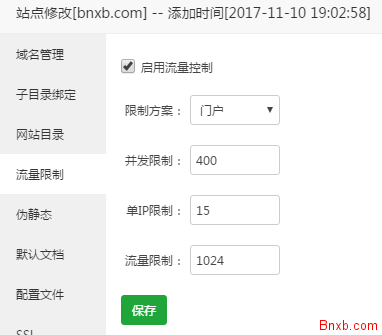
然后到需要开启防御的网站管理 点 设置-流量限制
这里启用流量限制,并将单IP并发数进行限制,一般如果网站页面不复杂设置为10就行。如果网页有很多调用CSS,JS之类的,自行计算一下

这样重启 NGINX 后当有客户端频繁刷新你的网页,发起的请求将在超过设置的每秒钟允许数量后被禁止访问,同时将在 NGINX error.log(默认在 /www/wwwroot/nginx_error.log) 中看到类似记录:
2018/04/27 14:25:27 [error] 6307#0: *1472746 limiting connections by zone "perip", client: 182.161.35.139, server: 104.153.102.68, request: "GET /index.php?10=8 HTTP/1.1"
此时请求已经被 NGINX 限流,但是客户端仍然能够继续发送请求到NGINX,还是会占用一定的服务器资源。
因此接下来进行shell脚本设置,将这个client的IP直接通过防火墙封杀
首先升级系统软件并安装iptables
连接SSH执行
yum -y update
对系统软件进行必要升级。
接下来确认你的系统版本,脚本在CENTOS6,CENTOS7下均测试可用,但是CENTOS7默认防火墙是firewalle,这个暂时没研究怎么设置,所以还是建议大家安装一下iptables,如果是CENTOS6默认的防火墙是iptables那就无须这一步操作
#先检查是否安装了iptables
service iptables status
#安装iptables
yum install -y iptables
#升级iptables
yum update iptables
#安装iptables-services
yum install iptables-services
禁用/停止自带的firewalld服务
#停止firewalld服务
systemctl stop firewalld
#禁用firewalld服务
systemctl mask firewalld
二、进行脚本设置
进CENTOS
vi /www/wwwroot/iptables.sh
shell脚本如下
#!/bin/bash
tail /www/wwwlogs/nginx_error.log -n 200 | grep "perip"| awk -F'[ ,]' '{print $13}' | sort | uniq | sort -n > /www/wwwroot/drop_ip.txt
for i in $(cat /www/wwwroot/drop_ip.txt)
do
FLAG=0
  for j in $(cat /www/wwwroot/drop_ip_all.txt)
do
      if [ $i = $j ]; then
        FLAG=1
        break
      fi
  done
  if [ $FLAG -eq 0 ]; then
    echo --new drop ip:$i
    #add to iptables
    /sbin/iptables -C INPUT -s $i -j DROP
  fi
done

#select drop_ip.txt append to drop_ip_all.txt
cat /www/wwwroot/drop_ip.txt >> /www/wwwroot/drop_ip_all.txt

#drop_ip_all remove repeat ip
#cat /www/wwwroot/drop_ip_all.txt | sort | uniq > /www/wwwroot/drop_ip_all.txt
对于部分较低版本的IPTABLES防火墙可能不支持-C参数,可以改成-I,
iptables -C INPUT -s $i -j DROP
改成
iptables -I INPUT -s $i -j DROP
另外针对部分环境,宝塔存在BUG,无法记录到流量控制信息,比如部分系统反代的情况下就有出现无法记录流控错误信息的情况,造成无法防御的情况,可以将第一句改成从网站日志取值
tail /www/wwwlogs/nginx_error.log -n 200 | grep "perip"| awk -F'[ ,]' '{print $13}' | sort | uniq | sort -n > /www/wwwroot/drop_ip.txt替换成
tail -1000 /www/wwwlogs/bnxb.com.log |cut -d ' ' -f 1 | sort |uniq -c | awk '{if ($1 > 100) print $0}' > /www/wwwroot/drop_ip.txt意思是读取网站日志的前一千条记录(防止日志过大读取压力大),然后取这一千条中访问超过100的记录,进行屏蔽,但是不建议用这种方式,这种方式对于平时没什么访问量的网站会造成,前一千条可能都是蜘蛛的爬行记录,这里的IP都是搜索引擎的蜘蛛IP,可能会误杀
三、对脚本进行权限提升和写入自动任务
chmod +x /www/wwwroot/iptables.sh
echo "* * * * * root /www/wwwroot/iptables.sh" >> /etc/crontab
service crond restart
这里设置为每分钟执行一次。
然后还可以设置每天凌晨重启防火墙
echo "01 1 * * * root /etc/init.d/iptables restart" >> /etc/crontab
service crond restart
四、确定计划任务已经执行
执行
crontab -l
看看有没有一条
* * * * * root /www/wwwroot/iptables.sh
如果没有可能是服务器用的系统,计划任务配置文件已经被改动过不是/etc/crontab了
可以执行
crontab -e
按i进入插入模式,手动将下面代码黏贴进去
* * * * * root /www/wwwroot/iptables.sh
然后按ESC,按shift+; 输入wq回车保存
service crond restart
crontab -l
当然如果你是套了CDN,那也是有解决办法的,但是需要你的CDN提供商支持IP防火墙,也就是IP黑名单功能,比如我们合作的Cloudflare就支持这个功能(https://cdn.bnxb.com),这里会生产一份封禁的IP黑名单,所以可以直接把这些IP提交到CDN,我们的API可以实现这个效果,详见(https://cdn.bnxb.com)
另外如果您只是需要记录下IP,并用来把这些IP通过我们的CDN.BNXB.COM的批量防火墙导入功能来导入,那建议用这个脚本来生成工具IP的TXT文件,用于批量提交
#!/bin/bash
tail -1000 /www/wwwlogs/tool.bnxb.com.log |cut -d ' ' -f 1 | sort |uniq -c | awk '{if ($1 > 100) print $2}' > /www/wwwroot/drop_ip.txt
for i in $(cat /www/wwwroot/drop_ip.txt)
do
FLAG=0
  for j in $(cat /www/wwwroot/drop_ip_all.txt)
do
      if [ $i = $j ]; then
        FLAG=1
        break
      fi
  done
  if [ $FLAG -eq 0 ]; then
    echo $i >> /www/wwwroot/drop_ip_all.txt
  fi
done
只需要提交drop_ip_all.txt到我们的https://cdn.bnxb.com/ipfirewall.php就行了
- 最新评论
